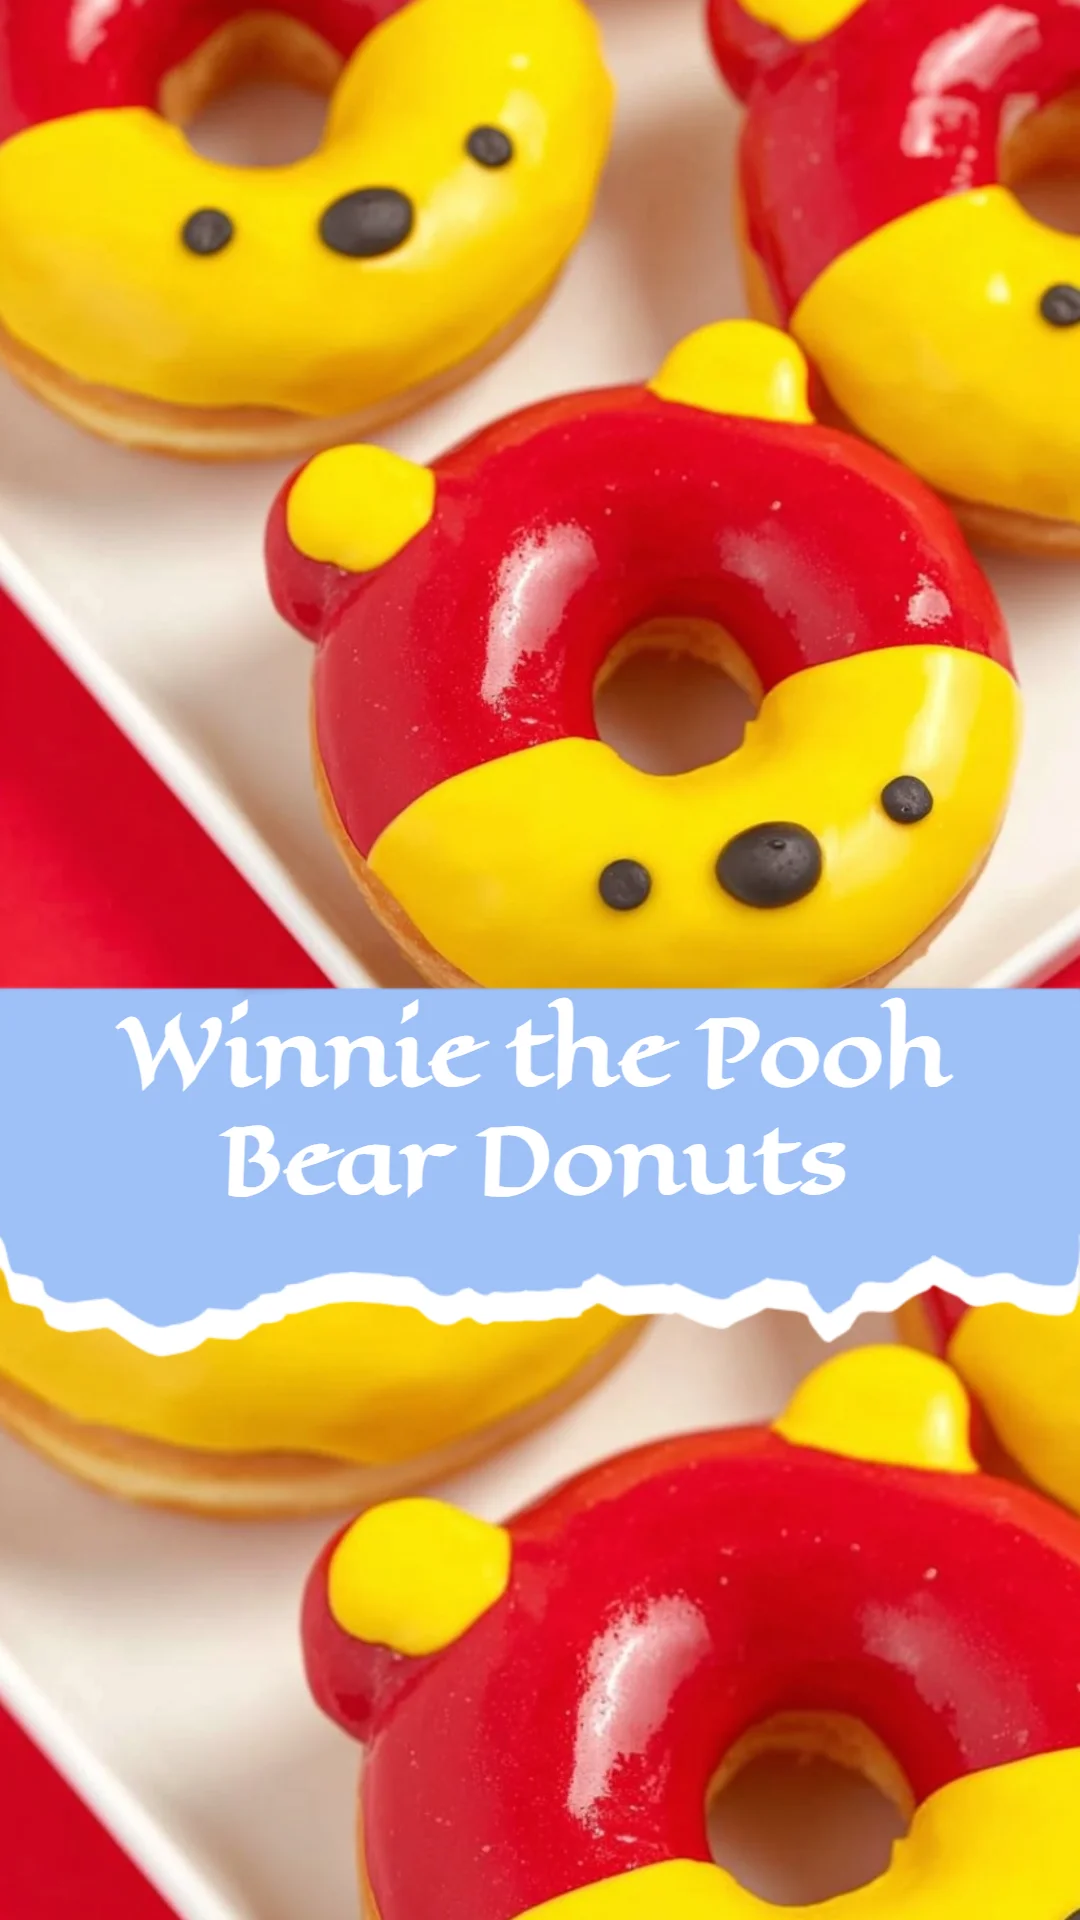
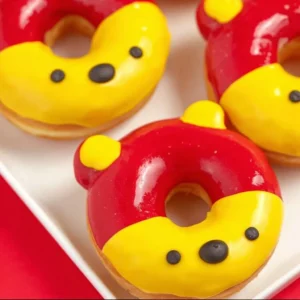
Winnie the Pooh Bear Donuts
Planning a baby shower can sometimes feel like a juggling act—especially when you’re trying to please a crowd while managing last-minute tasks and a long guest list. You might find yourself wondering if you’ll have enough food, how to present it nicely, or if it will all come together seamlessly. If you’ve ever felt that pang of anxiety as you try to whip up treats, I’m here to reassure you: this recipe for Winnie the Pooh Bear Donuts is your ticket to stress-free baking. It’s delicious, adorable, and guarantees a smile from everyone who tastes it.
A Quick Look at This Winnie the Pooh Bear Donuts Recipe
This delightful recipe for Winnie the Pooh Bear Donuts is not just a hit among kids but also loved by adults, too! With simple ingredients like flour and sugar—things your guests already adore—making these donuts is a breeze. Plus, they are make-ahead friendly, allowing you to prepare them in advance and enjoy the celebration without a last-minute rush. These bear-shaped treats are perfect for baby showers and casual parties alike, ensuring everyone will leave with a sweet smile!
Ingredients You’ll Need for Winnie the Pooh Bear Donuts
Essentials
- 1 cup flour
- 1/3 cup sugar
- 1 teaspoon baking powder
- 1/2 teaspoon salt
- 2 tablespoons unsalted sweet cream butter, melted
- 1 large egg
- 1/3 cup + 1 1/2 tablespoons whole milk
- 1 teaspoon pure vanilla extract
- 1 cup powdered sugar
- 1 teaspoon pure vanilla extract
- 1/4 teaspoon kosher salt
- 4 tablespoons whole milk
- Yellow and red gel food coloring
- Black cookie icing
- 1 bag of yellow candy melting wafers (at least 30 candy wafers in total)
- Plastic decorating bag
Optional Add-ons
To make your Winnie the Pooh Bear Donuts even more special, consider adding sprinkles on top of the glaze or using a honey-flavored icing. If you’re baking for a themed baby shower, try coordinating the colors of the icing with the party theme or using different-shaped candy melts for the ears. These fun small touches can take your donuts to the next level without complicating the overall process.
Substitutions and Shortcuts
If you’re short on time or ingredients, feel free to use store-bought donut mixes or pre-made icing. Disposable piping bags can simplify decorating, and using a box mix can cut down on prep. For a gluten-free option, swap out regular flour for a gluten-free blend, ensuring your guests with dietary restrictions can still delight in these treats!
Ingredient Alternatives for Allergies or Availability
If you’re concerned about gluten, it’s essential to check that any flour alternative you choose is certified gluten-free to avoid cross-contamination. For dairy allergies, look for non-dairy milk options or plant-based butter as a substitute. Always double-check ingredient labels for hidden gluten sources. These thoughtful changes ensure everyone can enjoy the fun of Winnie the Pooh Bear Donuts without worry.
How to Make Winnie the Pooh Bear Donuts Step-by-Step
- Preheat your oven to 350°F. Prepare your donut pan with cooking spray, ensuring that the donuts release easily after baking.
- In a large mixing bowl, sift together the flour, sugar, baking powder, and salt. This step helps ensure your donuts have a light, fluffy texture.
- In a separate bowl, whisk together the egg, milk, melted butter, and vanilla extract until fully combined.
- Gradually pour the wet ingredients into the dry ingredients, whisking together until smooth and well-blended.
- Spoon the batter into the donut pan, filling each cavity about halfway, and bake for 10 minutes or until golden brown.
- Let the donuts cool slightly in the pan before flipping them out onto a wire rack to finish cooling.
- Prepare the glaze by combining powdered sugar, vanilla extract, salt, and milk in a large bowl. Mix until smooth.
- Partition the glaze into two bowls; color one yellow and the other red using gel food coloring.
- Once the donuts are cool, create a slit for Pooh’s ears on each side and gently insert candy melts into the slits.
- Pour the yellow glaze over the donuts until completely coated and let dry for about an hour.
- To add the red glaze on the bottom half, shield the top with a spatula, carefully pouring the glaze over the bottom portion.
- Finally, with black icing, draw Pooh’s cute little face on the dried glaze. Let it set completely before serving.
Common Mistakes to Avoid
When preparing for your baby shower, it’s easy to feel overwhelmed. Avoid stress by keeping your cooking straightforward and efficient. Here are some common mistakes to look out for:
Mistake 1: Failing to Prepare Ahead
Don’t wait until the last minute to bake. Make your Winnie the Pooh Bear Donuts a day ahead to reduce stress on the day of the event.
Mistake 2: Overcomplicating Presentation
Stick to simple plating that allows guests to serve themselves easily. Use a tiered stand or simply arrange the donuts on a decorative platter for a visually appealing display without too much effort.
Mistake 3: Ignoring Cleanup
Plan for easy cleanup by using disposable baking sheets and bowls. Limiting the number of dishes will make the post-party cleanup far less daunting.
Serving Suggestions for Winnie the Pooh Bear Donuts
Serving your Winnie the Pooh Bear Donuts can be just as delightful as making them! These treats can easily be incorporated into a buffet or table setup, making them a simple and fun addition to any baby shower.
Set Up a Donut Station
Create a DIY donut station where guests can serve themselves. Offer a few different toppings like sprinkles or extra icing to inspire creativity.
Perfect Finger Food
These donuts are ideal for a finger food setup, allowing guests to enjoy them as they mingle without needing extra utensils.
Quick Refills
Plan for quick refills by keeping a small stash of extra baked donuts nearby. This way, no guest will be left donut-less during the celebration!
Hosting a baby shower doesn’t have to feel overwhelming. With the easy recipe for Winnie the Pooh Bear Donuts, you’ll save time and effort while pleasing a crowd. This versatile and adorable treat is sure to delight your guests, making your celebration feel extra special. Use this recipe to add a sweet touch to your gathering and create memorable moments!
FAQs About Winnie the Pooh Bear Donuts
Absolutely! You can prepare Winnie the Pooh Bear Donuts a day in advance and simply glaze them right before your event to keep them fresh.
This recipe typically makes around 12 donuts, making it perfect for small or medium-sized gatherings.
These donuts can be served on a tiered stand or a simple platter. They make great finger foods that guests can enjoy while socializing!
Store any leftover donuts in an airtight container at room temperature for up to 2 days. You can also refrigerate them for a slightly longer shelf life.
Yes, you can freeze the donuts without glaze for up to 2 months. Just thaw them at room temperature and then glaze before serving for best results.
Winnie the Pooh Bear Donuts
Ingredients
Essentials
- 1 cup flour
- 1/3 cup sugar
- 1 teaspoon baking powder
- 1/2 teaspoon salt
- 2 tablespoons unsalted sweet cream butter, melted
- 1 large egg
- 1/3 cup + 1 1/2 tablespoons whole milk
- 1 teaspoon pure vanilla extract
- 1 cup powdered sugar
- 1 teaspoon pure vanilla extract
- 1/4 teaspoon kosher salt
- 4 tablespoons whole milk
- Yellow and red gel food coloring
- Black cookie icing
- 1 bag yellow candy melting wafers (at least 30 candy wafers in total)
- Plastic decorating bag
Optional Add-ons
- Sprinkles for decoration
- Honey-flavored icing for flavor variation
Instructions
Preparation
- Preheat your oven to 350°F. Prepare your donut pan with cooking spray.
- In a large mixing bowl, sift together the flour, sugar, baking powder, and salt.
- In a separate bowl, whisk together the egg, milk, melted butter, and vanilla extract until fully combined.
- Gradually pour the wet ingredients into the dry ingredients, whisking together until smooth.
- Spoon the batter into the donut pan, filling each cavity about halfway.
- Bake for 10 minutes or until golden brown.
- Let the donuts cool slightly in the pan before flipping them out onto a wire rack.
Glazing and Decoration
- Prepare the glaze by combining powdered sugar, vanilla extract, salt, and milk in a bowl. Mix until smooth.
- Partition the glaze into two bowls; color one yellow and the other red with gel food coloring.
- Once the donuts are cool, create a slit for Pooh’s ears on each side and gently insert candy melts.
- Pour the yellow glaze over the donuts until fully coated and let dry for about an hour.
- Add the red glaze on the bottom half by shielding the top with a spatula.
- Use black icing to draw Pooh’s face on the dried glaze.
- Let the icing set completely before serving.