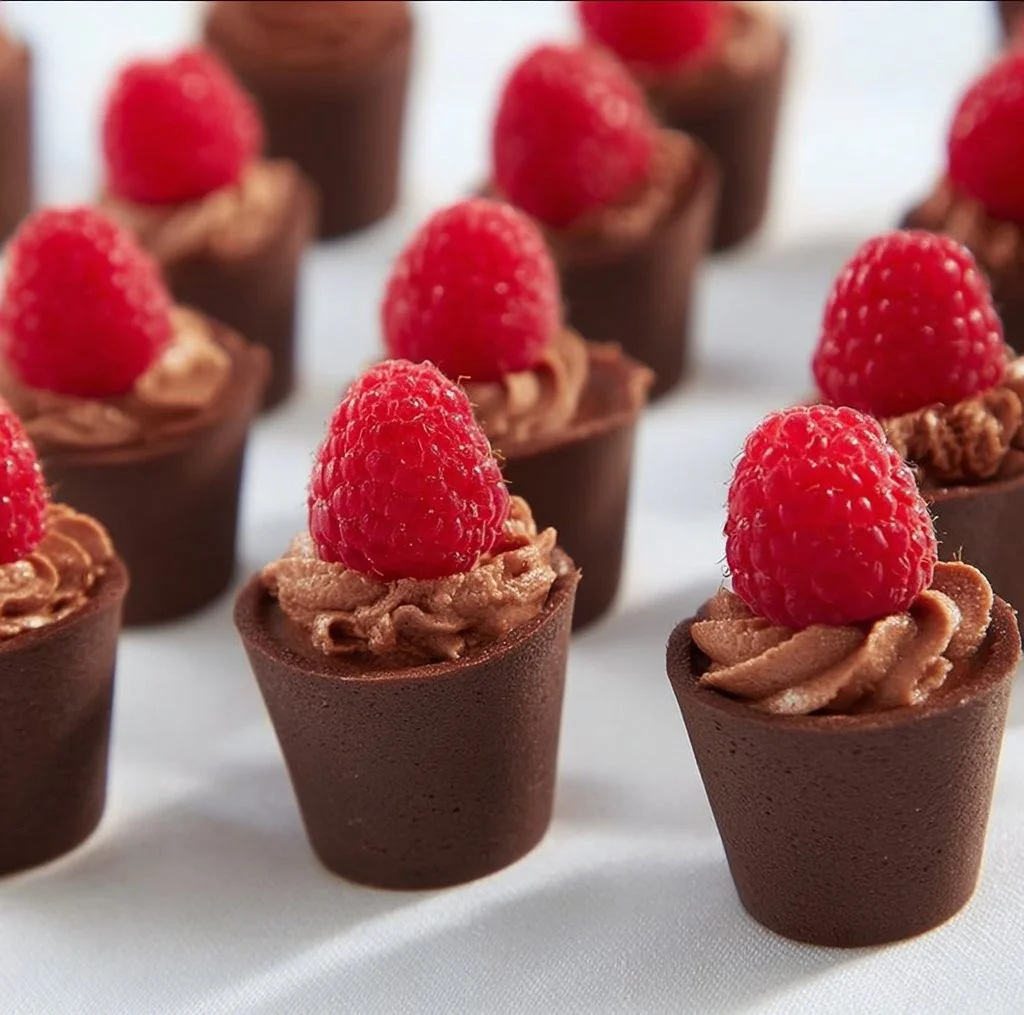
Mini Dark Chocolate Mousse Cups
I’m setting a graceful table for a baby shower where every detail feels considered — soft linens, a few stems of garden roses, and small, jewel-like desserts that invite guests to linger. As a host, you may worry that the food must look effortlessly refined while fitting into a busy schedule; I promise this recipe for Mini Dark Chocolate Mousse Cups delivers that quiet elegance without stress, so you can enjoy the celebration as much as your guests will.
A Quick Look at This Mini Dark Chocolate Mousse Cups Recipe
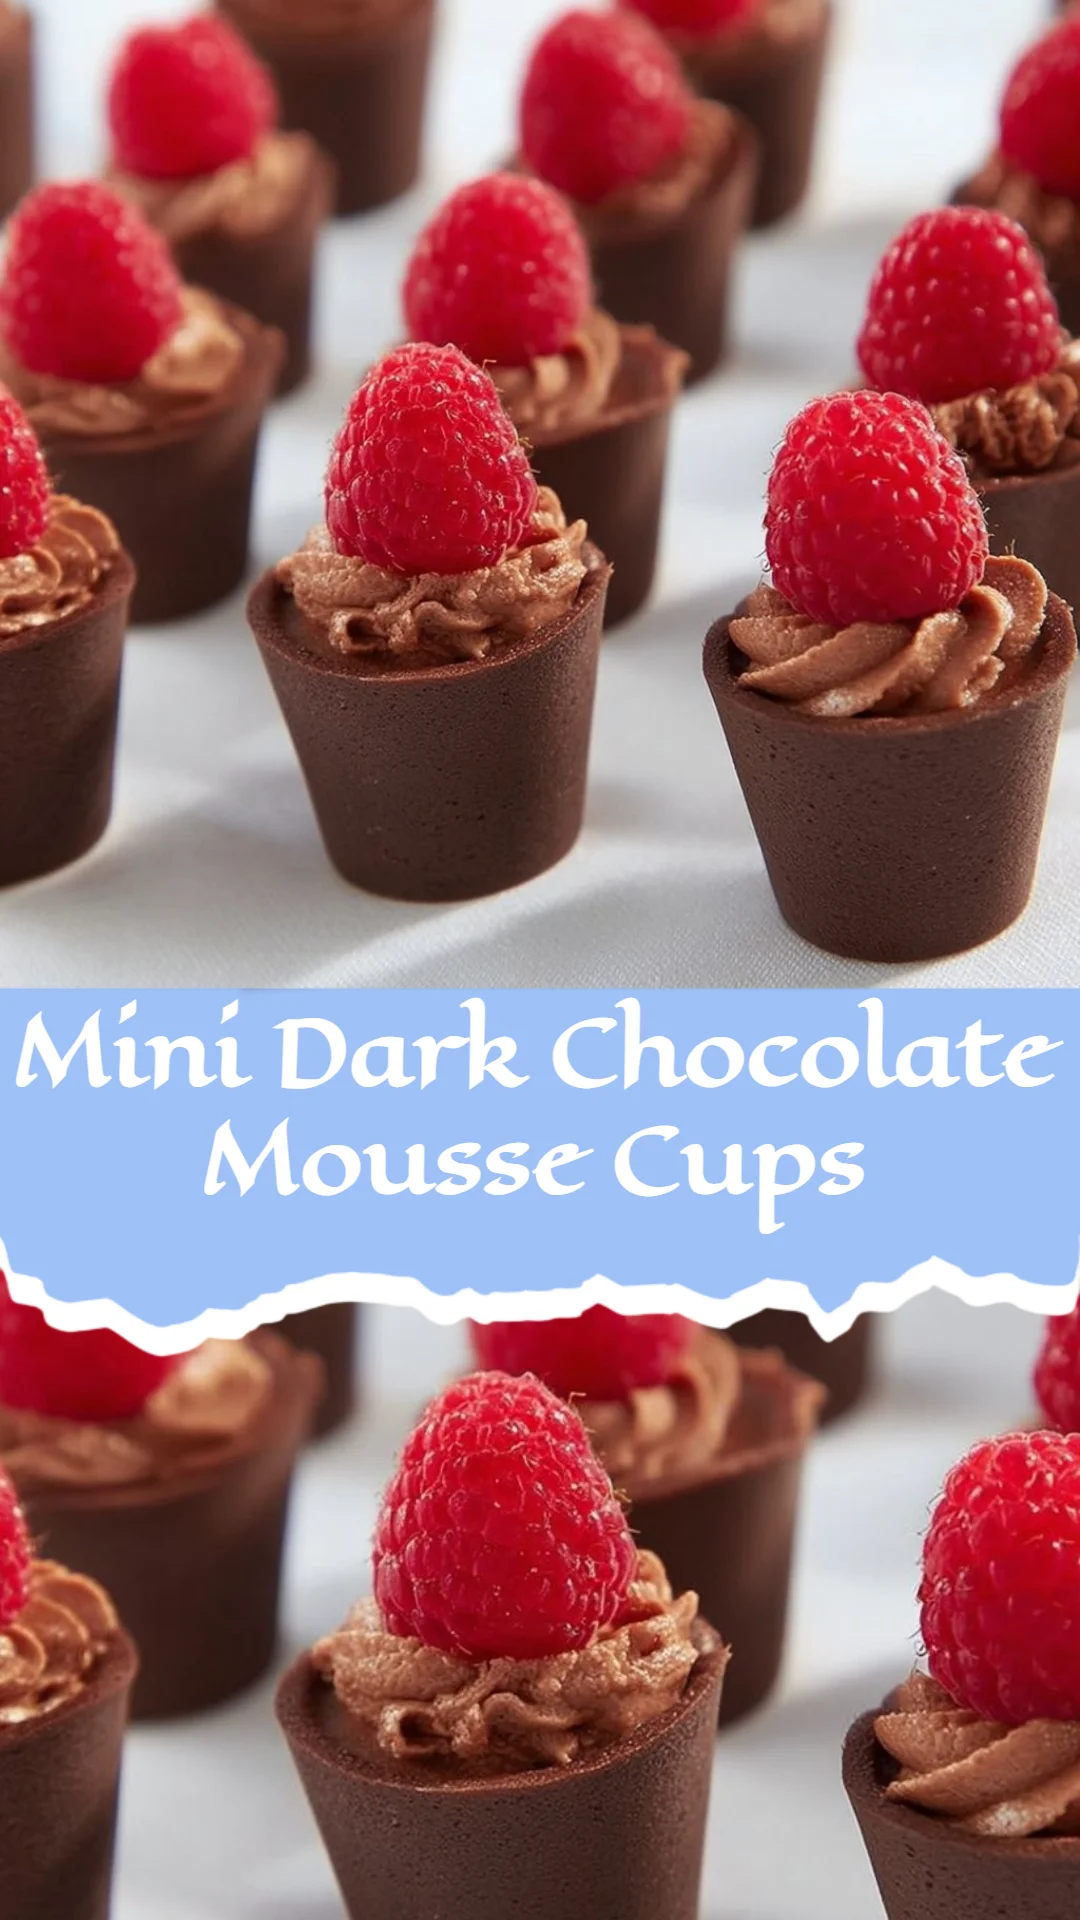
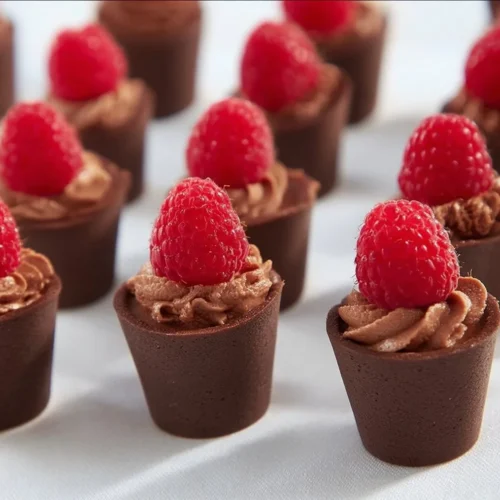
Luxurious 70% dark chocolate and pillowy whipped cream create a mousse with deep, sophisticated chocolate flavor and a silky texture that feels celebratory. The recipe’s strength is presentation: piped into small dark chocolate cordial cups, each serving arrives like a tiny, hand-delivered indulgence — perfect for a baby shower dessert table. It’s make-ahead friendly: prepare the mousse the day before, chill, and simply finish with fresh berries at serving time. The result is elevated but approachable, and there’s a neat little detail later that keeps the chocolate cups perfectly crisp — read on to find it.
Ingredients You’ll Need for Mini Dark Chocolate Mousse Cups
Essentials
- 125 grams (about 4.4 oz) 70% dark chocolate, roughly chopped — the high cocoa content gives depth and keeps the mousse from tasting overly sweet. Choose a high-quality bar for a clean chocolate flavor.
- 2 tablespoons unsalted butter — smooths and enriches the melted chocolate.
- 1 cup (240 ml) cold heavy cream — whipped to soft peaks to give the mousse its light, airy lift.
- 3 large eggs, separated — yolks add richness; whites create a feather-light texture. For safety at a baby shower, see substitutions below.
- 2 teaspoons granulated sugar — stabilizes the whipped egg whites and adds a touch of sweetness.
- 1 tablespoon boiling water — helps melt and gloss the chocolate for a silky base.
- 24 small dark chocolate cordial cups — these give the finished mousse a stunning chocolate shell; choose gluten-free cups when needed.
- Fresh raspberries (about 24) — optional garnish that adds color, tartness, and an elegant finish.
Notes:
- If you’re hosting an event that includes pregnant guests, I recommend using pasteurized eggs or one of the egg-free options described in Substitutions and Shortcuts.
- The recipe is naturally gluten-free if you select gluten-free chocolate cups and verify that all packaged ingredients are labeled GF.
Optional Add-ons
- Fine sanding sugar or edible gold dust — a whisper of sparkle for a shower that’s extra festive.
- Toasted hazelnuts or sliced almonds — sprinkle a few finely chopped nuts for crunch, placed carefully so the mousse remains delicate.
- Freeze-dried raspberry powder — a bright dusting over the top intensifies raspberry flavor without adding moisture.
- Tiny mint leaves or microherbs — provide a fresh contrast to the deep chocolate and look gorgeous on pale linens.
- A pinch of high-quality vanilla extract — if you prefer rounded warmth in the chocolate (avoid if you want pure dark cocoa intensity).
These add-ons are optional; they enhance presentation and flavor without adding complicated steps.
Substitutions and Shortcuts
- Egg safety: To avoid raw egg concerns, use pasteurized large eggs (both yolks and whites) available at many supermarkets. Alternatively, for an egg-free mousse, fold extra whipped cream into melted chocolate (see Egg-Free Method below).
- Egg-free method: Melt the chocolate and butter, allow to cool slightly, then fold into 2 cups of softly whipped cream until just combined. Chill to set. For a firmer texture, whisk 1 teaspoon powdered gelatin with 1 tablespoon cold water, bloom 5 minutes, then gently warm to dissolve and whisk into the melted chocolate before folding in the cream. (No alcohol in any step.)
- Shortcuts for time: Use store-bought gluten-free chocolate cups and chill them briefly before filling so they hold shape. You can also use a stand mixer or an electric hand mixer to speed up whipping.
- Lighter-sweet option: Use 60–65% chocolate instead of 70% for a softer chocolate note, or reduce the sugar slightly when whipping the egg whites.
- Make-ahead: The mousse benefits from an overnight chill. You can prepare the mousse 1–2 days ahead (store in an airtight container) and fill the cups the morning of the event for best visual results.
How to Make Mini Dark Chocolate Mousse Cups Step-by-Step
I write each step to be calm and clear so you can work confidently in a home kitchen. This method keeps things gluten-free and accessible: if you choose pasteurized eggs or the egg-free route, the steps are nearly identical.
Prepare your workspace and equipment
- Chill a medium mixing bowl for whipping cream for 10–15 minutes in the refrigerator — cold bowls help cream whip faster.
- Place the chocolate cordial cups on a tray lined with parchment for easy transfer later.
- If using a double boiler, set a heat-proof bowl over (but not touching) gently simmering water. If you’re using the microwave, prepare short bursts and stir frequently.
Melt the chocolate and butter
- Combine the chopped 70% dark chocolate and unsalted butter in your heat-proof bowl. Gently melt, stirring until glossy and fully smooth. If using the microwave, heat in 20–30 second intervals, stirring between each until melted.
- Stir in the 1 tablespoon boiling water; this thins the chocolate to a luxurious, silky consistency and helps it cool evenly.
- Set the bowl aside to cool until the chocolate measures approximately 100°F (warm to the touch but not hot). This temperature helps preserve the airy texture when you later add egg yolks. If you’re using pasteurized eggs or making the egg-free version, precise temperature is less critical — just avoid using hot chocolate that will deflate whipped cream.
Whip the cream
- Pour the cold heavy cream into your chilled bowl and whip to soft peaks. The texture should be light and billowy — not grainy, not too firm. Set the whipped cream in the refrigerator so it stays cool for folding.
Whip the egg whites with sugar
- In a clean, dry bowl, whisk the egg whites with the 2 teaspoons sugar until soft peaks form. The whites should be glossy and hold a soft point when you lift the whisk. If you’re using pasteurized whites, the process is the same. For an egg-free mousse, skip this step.
Incorporate the yolks
- Once the melted chocolate has cooled to about 100°F, stir in the separated egg yolks, one at a time, until fully combined. This enriches the chocolate base and creates a silkier mouthfeel.
Build the mousse in stages
- Gently fold approximately half of the whipped cream into the chocolate and yolk mixture using a silicone spatula. This first fold lightens the base and makes final incorporation easier.
- Next, fold in half of the whipped egg whites until just incorporated — take care to preserve as much air as possible.
- Return to the whipped cream and fold in the remaining half, then finish by folding in the remaining egg whites. Work gently and deliberately; over-folding will deflate the mousse and make it dense. The finished mousse should be airy and hold soft peaks.
Notes on technique:
- Use broad strokes and rotate the bowl as you fold; think of turning a page rather than stirring.
- Stop folding as soon as there are no streaks of chocolate; a slightly marbled look before chilling will settle into a uniform color.
Transfer and chill
- If serving as a traditional mousse in bowls, spoon or pipe the mixture into serving dishes, then cover tightly with plastic wrap.
- If using small chocolate cordial cups, place the cups on the tray and either pipe the mousse directly into the cups or fill a larger bowl, cover, then pipe into cups when slightly cooler to reduce condensation on the cups.
- Refrigerate for at least 8 hours or overnight. This chilling time lets the mousse set properly and makes it easier to handle when garnishing.
Finish and serve
- Remove mousse from the refrigerator about 30 minutes before serving to take the chill off and allow the texture to soften to a silky mouthfeel.
- If you filled cups directly, garnish each with a single fresh raspberry or a light dusting of freeze-dried raspberry powder. If the cups are seated on a buffet, present them on a tray with little parchment doilies for a refined look.
- If you prepared a bowl and plan to pipe into cups at the event, keep the mousse chilled until about 30 minutes before you expect to pipe. Warming slightly makes piping smoother, but avoid letting it go runny.
Egg-free method (quick recap)
- Melt chocolate and butter, allow to cool a touch, then fold into 2 cups whipped cream. For a firmer set, bloom and dissolve 1 teaspoon gelatin into the chocolate before folding. Chill overnight and fill cups as above.
Make-ahead and gluten-free notes
- Mousse holds beautifully in the refrigerator for up to 48 hours in an airtight container. For travel, keep mousse chilled in a cooler with ice packs and finish garnishing on-site.
- Confirm that your chocolate cordial cups are labeled gluten-free if any guests have dietary restrictions; most of the steps above are naturally gluten-free.
Common Mistakes to Avoid
Treat mistakes as small adjustments; each one is an opportunity to make the next batch even better.
Mistake 1: Overcomplicating presentation
A trio of dramatic elements can feel cluttered. Simple, consistent presentation — matching cups, uniform garnish, and a tidy tray — reads as refined. For example, use the same fruit garnish on each cup and limit toppings to one or two accents so the rich chocolate remains the star.
Mistake 2: Poor timing and prep planning
Waiting until the event morning to make everything creates unnecessary stress. This mousse is forgiving and rewards planning: make it a day ahead, chill, and reserve the final garnish for the moment of service. Keeping a clear timeline — chocolate melted the day before, whipped components assembled the morning of — saves time and nerves.
Mistake 3: Serving logistics for gatherings
Not considering how guests will pick up and eat the cups leads to spills and broken shells. Arrange cups on a low-rimmed tray or tiered stand so guests can lift them easily, and include small spoons on the tray. If you’re offering a buffet, place the mousse near napkins and plates to encourage comfortable gathering.
Serving Suggestions for Mini Dark Chocolate Mousse Cups
These little cups are versatile — choose one approach and execute it well for a polished dessert experience.
Begin with a succinct presentation thought: tiny desserts are about proportion and restraint. When you serve a small, intensely flavored treat, each element should complement the chocolate rather than compete.
Elegant plating and garnish
Place each mousse cup on a small white or pastel doily to create contrast with the dark chocolate. Finish with one or two raspberries and a tiny mint leaf, or a fine dusting of freeze-dried raspberry powder. If you want a subtle sheen, very gently brush the rim of the chocolate cup with a thin line of tempered chocolate before adding the mousse — it will catch the light beautifully.
Buffet-style or table-ready serving
Set the cups on tiered dessert stands at differing heights to create visual interest, and group them in small clusters rather than a single large platter for ease of access. Provide small dessert spoons and stack cocktail napkins nearby. If guests will be mingling, place trays of mousse near seating areas to encourage relaxed consumption.
Pairing with other baby-shower foods
Mini Dark Chocolate Mousse Cups pair beautifully with lighter finger foods: lemon bars, delicate tea sandwiches (cucumber and cream cheese, egg salad with chives), or plain shortbread biscuits. Balance is key: follow a heavy chocolate dessert with bright, citrus-forward items earlier on the menu. For beverages, offer decaffeinated tea options and flavored sparkling water to complement the richness without alcohol.
Conclusion
I hope these Mini Dark Chocolate Mousse Cups become a quiet centerpiece of your baby shower — elegant, indulgent, and manageable for a busy host. They offer a beautiful balance of deep chocolate flavor and airy texture, and they travel and chill well so you can focus on the celebration. If you’d like a quick reference for the original inspiration and variations, I also recommend this helpful guide to Mini Dark Chocolate Mousse Cups – Feed Them Wisely which complements the techniques I share here.
FAQs About Mini Dark Chocolate Mousse Cups
I recommend making the mousse up to 48 hours ahead and refrigerating it in an airtight container. If you’ve piped the mousse into chocolate cups, keep them chilled and add fresh garnishes the day of the event. This timeline preserves texture and ensures the chocolate cups stay crisp.
Yes. I suggest using pasteurized eggs if you’re following the original egg-based method. For a completely egg-free option, use extra whipped cream folded into melted chocolate (or stabilize with a touch of dissolved gelatin). Both approaches produce a rich mousse that is fully suitable for guests who avoid raw eggs.
Store leftover mousse cups in an airtight container in the refrigerator for up to 48 hours. If the chocolate cups become slightly softer from moisture, allow them to come to room temperature briefly before serving — this restores a delightful, silky texture without making them soggy.
For a large gathering, I suggest preparing the mousse ahead and piping into cups the morning of the event, or filling cups the day before and chilling. Arrange them on tiered stands or several small trays so guests can help themselves easily. Keep spoons and napkins nearby to streamline service.
Absolutely. The mousse is a neutral, elegant canvas: garnish with color-coordinated berries, edible flowers, or a light dusting of colored sugar to match your theme. You can also switch to a slightly milder chocolate (60–65%) for a softer flavor profile that pairs well with pastel themes.
Mini Dark Chocolate Mousse Cups
Ingredients
Essentials
- 125 grams 70% dark chocolate, roughly chopped Choose a high-quality bar for a clean chocolate flavor.
- 2 tablespoons unsalted butter Smooths and enriches the melted chocolate.
- 1 cup cold heavy cream Whipped to soft peaks for lift.
- 3 large eggs, separated Yolks add richness; whites create a feather-light texture.
- 2 teaspoons granulated sugar Stabilizes whipped egg whites.
- 1 tablespoon boiling water Helps melt and gloss the chocolate.
- 24 small dark chocolate cordial cups These give the mousse a stunning chocolate shell.
- 24 pieces fresh raspberries Optional garnish for color and tartness.
Optional Add-ons
- Fine sanding sugar or edible gold dust For a festive touch.
- Toasted hazelnuts or sliced almonds Add crunch without complicating steps.
- Freeze-dried raspberry powder Enhances raspberry flavor without moisture.
- Tiny mint leaves or microherbs Adds a fresh contrast.
- A pinch of high-quality vanilla extract For rounded warmth in the chocolate.
Instructions
Prepare your workspace
- Chill a medium bowl for whipping cream for 10–15 minutes.
- Place the chocolate cordial cups on a tray lined with parchment.
Melt the chocolate and butter
- Combine the chopped dark chocolate and unsalted butter in a heat-proof bowl and gently melt.
- Stir in boiling water until chocolate is silky and glossy.
- Set aside to cool until approximately 100°F.
Whip the cream
- Pour the cold heavy cream into the chilled bowl and whip to soft peaks.
- Set the whipped cream in the refrigerator to stay cool.
Whip the egg whites
- In a clean bowl, whisk the egg whites with sugar until soft peaks form.
Incorporate the yolks
- Stir in egg yolks into the cooled chocolate until combined.
Build the mousse
- Fold half of the whipped cream into the chocolate mixture.
- Fold in half of the whipped egg whites, preserving air.
- Repeat with the remaining whipped cream and egg whites.
Transfer and chill
- Spoon or pipe the mixture into the chocolate cups.
- Refrigerate for at least 8 hours or overnight.
Finish and serve
- Remove from refrigerator 30 minutes before serving.
- Garnish with fresh raspberries or optional toppings.