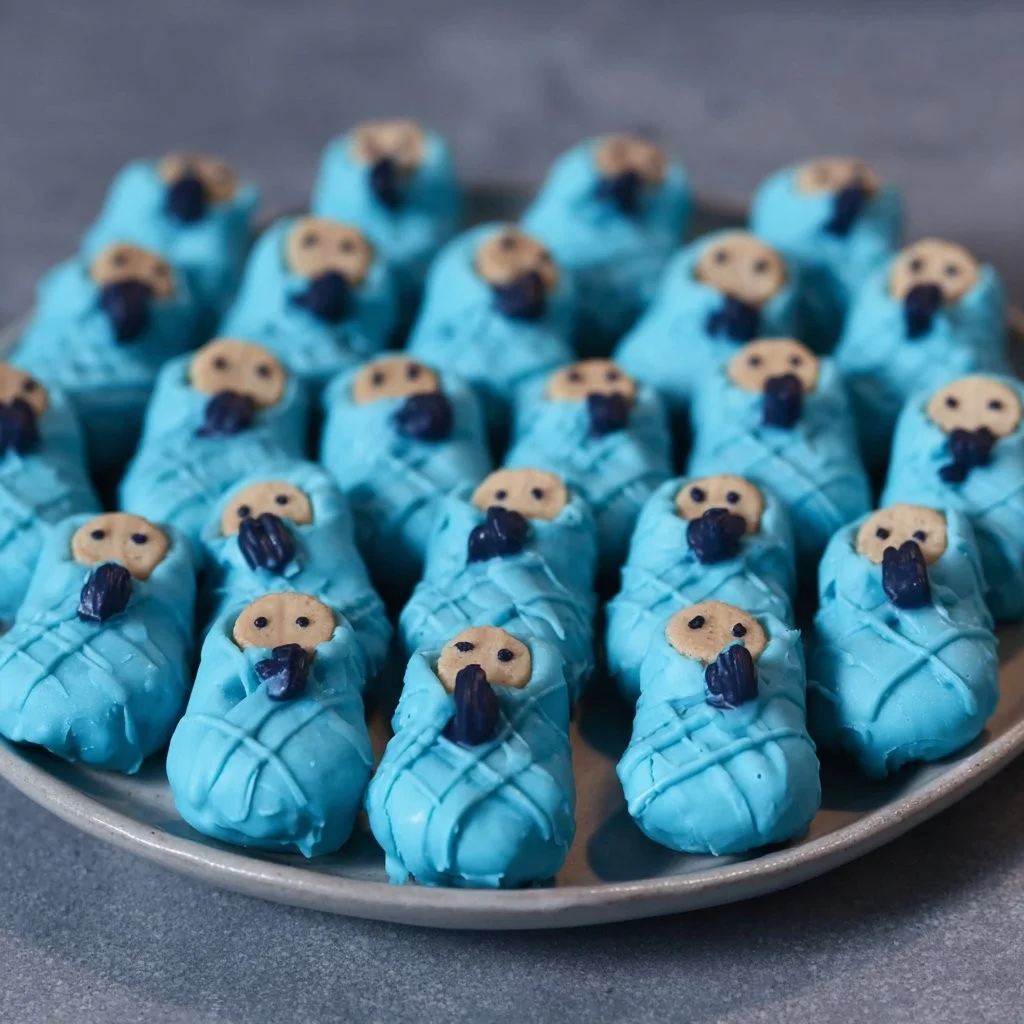
Nutter Butter Babies
A last-minute guest list change, a sink full of dishes, and a short window to pull together a spread — I know that frantic feeling when a baby shower day arrives. If you’re short on time, worried about presentation, or feeding a crowd, these Nutter Butter Babies are a calm, reliable solution: easy to make, cute on a platter, and crowd-friendly so you can breathe and enjoy the celebration.
A Quick Look at This Nutter Butter Babies Recipe
This Nutter Butter Babies recipe uses two ingredients most guests already love: creamy white chocolate and classic Nutter Butter cookies. It’s make-ahead friendly and simple to serve — no slicing, no messy fillings, just dip and decorate. The cookies are bite-sized, easy for buffet tables or finger-food setups, and fun to match to any shower color with food coloring. Expect fast prep, minimal cleanup, and a dessert that looks special without stress.
Ingredients You’ll Need for Nutter Butter Babies
Essentials
- 1 (16 oz) pack Nutter Butter cookies (about 32 cookies) — these are the baby faces and the base.
- 12 oz white chocolate chips — for coating and the “blanket.”
- 1 tablespoon coconut oil — keeps melted chocolate glossy and smooth.
- Food coloring — gel or liquid, choose pastel colors for baby-shower themes.
- Black icing with a thin tip — for eyes and the top swirl/face details.
- Parchment paper — for cooling and easy cleanup.
Optional Add-ons
- Edible shimmer dust or pearl dust — for a subtle, fancy sheen on the “blankets.”
- Sprinkles or nonpareils — use sparingly on the blanket edges for texture.
- Colored piping gel or edible markers — another way to add tiny details.
- Mini cupcake liners — place each cookie in a liner for individual servings on the buffet.
- Fresh mint leaves or small sugar flowers — tuck around cookies on the platter for presentation.
Substitutions and Shortcuts
- Pre-colored candy melts — skip melting white chocolate + food coloring; use colored melts for speed.
- White almond bark — melts quickly and is very forgiving if you’re short on time.
- Store-bought decorated wafer toppers — press one into each cookie top instead of piping faces if you want a no-piping shortcut.
- Disposable piping bags or squeeze bottles — faster cleanup than reusing tools.
- Microwave method: if you’re in a hurry, you can microwave the chocolate in short bursts (see pro tips below for safe melting).
Ingredient alternatives for allergies or availability
- Peanut allergy: Nutter Butter cookies contain peanut butter. If any guest has a peanut allergy, I recommend swapping for a peanut-free sandwich cookie with a rounded top (look for vanilla sandwich cookies or specialty peanut-free “butter” cookies). Clearly label the tray to avoid confusion.
- Dairy-free / vegan: Use dairy-free white chocolate or vegan candy melts and verify the Nutter Butter-style cookie is dairy-free (or swap for a dairy-free sandwich cookie).
- Gluten-free: If gluten is a concern, use certified gluten-free sandwich cookies shaped like Nutter Butters or buy allergy-friendly cookies designed for decorating. Note: many peanut butter cookies contain wheat, so always check labels.
- Nut-free alternative: If you need nut-free, use vanilla sandwich cookies or allergy-safe cookies. They won’t be authentic Nutter Butter cookies but will still work beautifully as “babies.”
- Avoiding hidden gluten sources: Check all packaged items (white chocolate chips, sprinkles, icing) for “may contain wheat” or cross-contamination warnings. Choose certified gluten-free brands if you need strict gluten control.
I always label trays clearly at the shower if I swap ingredients for allergies. That small step keeps guests comfortable and prevents accidental exposure.
How to Make Nutter Butter Babies Step-by-Step
I keep these steps short and calm so you can get through them without stress. Plan about 30–45 minutes active time and at least 1 hour to set, or leave overnight.
Prep your workspace
- Line a baking sheet with parchment paper. Set cookies out so they’re easy to reach. Have your black icing ready in a thin-tipped tube or small piping bag.
Melt the white chocolate
- Fill a small pot with 1–2 inches of water and bring to a gentle simmer. Put a heatproof bowl on top (double boiler). Add 12 oz white chocolate chips and 1 tablespoon coconut oil.
- Stir as it melts. When most chips are soft, turn off the heat and keep stirring until smooth. This keeps the chocolate glossy and prevents burning.
- If you don’t have a double boiler, see the pro tips below for a quick alternative.
Color the chocolate
- Add a few drops of food coloring and stir until you reach your desired shade. Use gel coloring for stronger hues with less liquid.
Dip and swaddle
- Pick up a Nutter Butter by the bottom, dip the top into the colored chocolate, and tilt so the chocolate covers both sides of the top, forming a “blanket swaddle” look. Let excess drip off and set each cookie on the parchment paper.
- Repeat for all cookies. Work in batches if your chocolate begins to thicken.
Add the blanket edge
- Dip the edge of a small spatula or the back of a spoon in the melted chocolate. Lightly drag it diagonally across each cookie to form a blanket edge texture. This step is quick and adds a cozy touch.
Draw faces
- Once the chocolate has set a little but is not fully hard, use black icing with a thin tip to draw two eyes and a small swirl or curl at the top of each cookie to mimic a baby’s hair curl.
- Don’t worry about perfect faces — a few different expressions make the tray look hand-made and charming.
Let them set
- Allow the cookies to sit at room temperature for at least 1 hour, or refrigerate for 15–20 minutes for faster setting. You can also chill them overnight in a single layer.
Store or plate
- Keep them in a single layer in an airtight container. If stacking, place parchment between layers to avoid sticking.
Make-ahead tips
- You can fully assemble these a day in advance and store them in the fridge, then let them come to room temperature before serving for best texture.
- Prepare the chocolate and do dipping the day before; draw faces the morning of the shower for fresher detail.
Pro tips (quick)
- For a microwave double-boiler alternative: place chips + coconut oil in a microwave-safe bowl. Heat 30 seconds, stir, repeat in 15-second bursts until mostly melted, then stir off-heat until smooth.
- If your chocolate thickens, stir in a little more coconut oil, a teaspoon at a time, to loosen it.
- Use a cooling rack over parchment to let drip-off chocolate fall cleanly for less mess.
Common Mistakes to Avoid
I want you to feel relaxed, so the biggest way to avoid stress is to plan small, simple steps ahead. These cookies are forgiving — focus on steady rhythm, not perfection, and you’ll save time and cleanup.
Mistake 1: Working with overheated chocolate
Overheating white chocolate makes it grainy and hard to work with. Melt slowly, turn off the heat when it’s mostly melted, and stir until smooth. If it gets thick, add a tiny bit of coconut oil.
Mistake 2: Doing all decorating in one long session
Trying to finish every detail in one non-stop push wastes time and adds stress. Dip all the cookies first, then add blanket edges, then do faces. Breaking the task into small stages is faster and less tiring.
Mistake 3: Not planning for transport or display
Cookies stuck together or smeared decorations happen when you don’t allow enough setting time. Let cookies fully set before stacking or packing. Use cupcake liners or parchment between layers for safe transport.
Serving Suggestions for Nutter Butter Babies
These cookies are perfect for buffet tables or a dessert tray when you want easy refill and minimal fuss. I like to keep presentation simple so guests can help themselves without a server.
Buffet tray setup
Arrange cookies in neat rows or in a circular pattern on a flat platter. Place small tongs beside the tray so guests can grab without touching multiple cookies. Use small signs if you swapped ingredients (e.g., “peanut-free” or “gluten-free”).
Finger-food stations
Place a handful in mini cupcake liners and cluster liners in baskets or tiered stands. That creates an individual serving look and keeps little hands clean.
Quick refills and minimal mess
Prep extras on a separate tray and keep them covered until the first tray is low. Replace tray quickly to keep the display full and tidy. If icing smudges, keep a damp paper towel at the serving table for quick cleanups.

Conclusion
I believe hosting a baby shower doesn’t need to be overwhelming — simple, sweet recipes win the day, and Nutter Butter Babies are one of my go-to, time-saving treats that look adorable and taste great. They save prep time, are easy to make ahead, and help you keep the dessert table neat and inviting. If you want a quick visual guide or an alternate take on decorating Nutter Butter baby faces, I like this step-by-step inspiration from Nutter Butter Baby Face Cookies – For the Love of Food to spark ideas.
FAQs About Nutter Butter Babies
I usually make them up to 24 hours ahead. Store in a single layer in an airtight container in the fridge and bring to room temperature before serving. If your venue is warm, keep them chilled until just before display.
One 16 oz pack (about 32 cookies) is great for 20–30 guests if you offer a few other desserts. If the cookies are the main sweet, plan on 1–2 cookies per guest.
Yes. Let them fully set, then place them in a single layer with parchment between layers. Use a sturdy box and avoid stacking heavy items on top. I recommend chilling them before transport so decorations are firm.
Store leftovers in an airtight container at room temperature for up to 2 days, or in the fridge for up to 5 days. If kept cool, they’ll keep their shape and the chocolate coating will stay glossy.
Absolutely. Multiply ingredients and work in batches. I set up an assembly line: melt chocolate, dip a tray of cookies, let them set while I do the next tray. That assembly rhythm keeps things fast and steady for bigger groups.

Nutter Butter Babies
Ingredients
Essentials
- 1 pack Nutter Butter cookies (16 oz) about 32 cookies; these are the baby faces and the base.
- 12 oz white chocolate chips for coating and the ‘blanket.’
- 1 tablespoon coconut oil keeps melted chocolate glossy and smooth.
- Food coloring gel or liquid, choose pastel colors for baby-shower themes.
- Black icing with a thin tip for eyes and face details.
- Parchment paper for cooling and easy cleanup.
Optional Add-ons
- Edible shimmer dust or pearl dust for a subtle, fancy sheen on the ‘blankets.’
- Sprinkles or nonpareils use sparingly on the blanket edges for texture.
- Colored piping gel or edible markers for adding tiny details.
- Mini cupcake liners for individual servings.
- Fresh mint leaves or small sugar flowers for presentation around cookies.
Instructions
Preparation
- Line a baking sheet with parchment paper. Set cookies out for easy access. Have your black icing ready.
Melting the Chocolate
- Fill a small pot with 1-2 inches of water and bring it to a gentle simmer. Place a heatproof bowl on top and add the white chocolate chips and coconut oil.
- Stir as it melts. Turn off the heat when most chips are soft and keep stirring until smooth.
Coloring the Chocolate
- Add a few drops of food coloring and stir until you reach the desired shade.
Dipping the Cookies
- Dip the top of each Nutter Butter into the colored chocolate, allowing excess to drip off and place on parchment paper.
- Repeat for all cookies, working in batches if chocolate thickens.
Adding the Blanket Edge
- Dip a small spatula in the melted chocolate and lightly drag it across each cookie to form a blanket edge texture.
Drawing Faces
- Use black icing to draw two eyes and a swirl for hair on each cookie once the chocolate has slightly set.
Setting the Cookies
- Allow the cookies to sit at room temperature for at least 1 hour or refrigerate for faster setting.
Storing or Serving
- Keep cookies in a single layer in an airtight container, using parchment between layers if stacking.