It’s a Boy! Puppy Chow
A soft blue runner down the center of the table, a stack of delicate napkins tied with satin ribbon, and a little bowl of something unexpectedly delightful — that’s the kind of scene I imagine when I plan a baby shower. Hosts often tell me they want treats that look thoughtfully curated but don’t require a pastry degree or an all-day commitment. That’s precisely why this recipe is my go-to: Puppy Chow turns pantry staples into a polished, crowd-pleasing snack in minutes, leaving you plenty of time to set the table and enjoy the company.
A Quick Look at This Puppy Chow Recipe
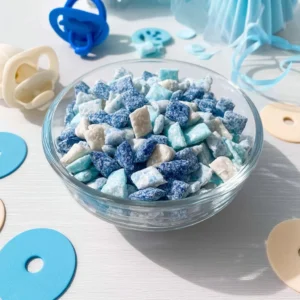
This It’s a Boy! Puppy Chow is built on crisp rice Chex cereal coated in three shades of candy melts — bright white, light blue, and royal blue — then dusted in powdered sugar for a delicate, snow-kissed finish. The candy melts give a clean, glossy coating that feels refined, while the powdered sugar provides the nostalgic, melt-in-your-mouth dusting guests love. It’s visually striking on a dessert table, easy to make ahead, and endlessly forgiving for home hosts. Elegant yet approachable, it’s the sort of sweet that invites curiosity and complements a soft, celebratory palette.
Ingredients You’ll Need for It’s a Boy! Puppy Chow
Below I break the recipe down into what you must have, small touches that elevate the flavor and presentation, and smart swaps when you’re short on time or ingredients. Everything is baby-shower appropriate and keeps the balance between beauty and practicality.
Essentials
- 3 cups rice Chex cereal (divided into three 1-cup portions) — naturally crisp and gluten-free, the perfect neutral base for colored coatings.
- 1/2 cup bright white candy melts — for the clean, elegant base tone.
- 1/2 cup light blue candy melts — a soft, celebratory hue.
- 1/2 cup royal blue candy melts — for depth and contrast on the tray.
- 1 cup powdered sugar (divided into roughly 1/3 cup per color, plus a little extra for touch-ups) — gives that classic “puppy chow” powdered finish and helps set the candy coating.
- Quart- or gallon-sized resealable plastic bags — for shaking the powdered sugar coat onto the cereal cleanly.
- Parchment paper or a silicone baking mat and a baking sheet — for drying and separating the pieces.
- Mixing bowls large enough to toss cereal with melted candy — deep bowls or soup bowls work best to keep the coating contained.
- Spoon or spatula for gentle tossing.
- Fine mesh sieve — optional but helpful for removing excess powdered sugar.
Optional Add-ons
- Baby-themed violet or white sugar pearls or tiny blue sprinkles (use sparingly to avoid clumping) — a refined accent for display bowls or favor bags.
- A light dusting of edible pearl or silver luster dust on some pieces for a very subtle sheen.
- Toasted slivered almonds or finely chopped pistachios (off to the side for nut-friendly guests) — adds an unexpected textural contrast and a hint of toasty flavor.
- Mini marshmallows in a separate bowl for a soft, pillowy complement on the dessert table.
- Small paper cones or clear favor bags tied with blue ribbon for individual servings or favors.
- A squeeze bottle of white chocolate for a light drizzle if you want an artisanal stripe on a portion of the mix.
Note: If serving to a group with nut allergies, keep any nuts distinct and clearly labeled.
Substitutions and Shortcuts
- Swap candy melts for high-quality white chocolate chips thinned with 1–2 teaspoons of neutral oil per 1/2 cup if you prefer a chocolate-based coating. Gently melt in short bursts and stir.
- Use pre-colored candy melts if you want exact shades; many craft stores and online shops carry baby-blue tones if grocery stores are limited.
- If you’re short on mixing bowls, melt one color at a time in a resealable bag, snip a corner, and drizzle over cereal in a bowl — then toss gently with a spatula. Work quickly so the melts don’t set mid-toss.
- For a quicker single-batch presentation, coat all 3 cups with white candy melts, dust with powdered sugar, then drizzle light and royal blue over top for a marbled effect (this will be more rustic-looking but faster).
- Use pre-portioned favor bags or small disposable cups to speed up assembly for a larger gathering.
- To save time on cleanup, line work surfaces with extra parchment and use disposable gloves for handling the coated cereal.
How to Make It’s a Boy! Puppy Chow Step-by-Step
This recipe is naturally gluten-free thanks to rice Chex cereal, and I find that clear, calm steps keep the process feeling effortless. I’ll guide you through each color so you understand why each move matters and how to keep everything smooth and presentable.
Prepare your workspace
- Line a baking sheet with parchment paper or a silicone mat and set it within reach. Measure the cereal into three even 1-cup portions and set each aside in separate small bowls. Portion about 1/3 cup powdered sugar into a clean quart- or gallon-sized resealable plastic bag for the first color. Having everything staged keeps the process quick and stress-free.
Melt the brightest (white) candy melts
- Place the bright white candy melts in a microwave-safe bowl. Microwave in 15–20 second bursts, stirring well between bursts, until the melts are glossy and fully smooth. Frequent stirring prevents overheating and ensures a silky coating. If a few small lumps remain, stirring off the heat will usually finish the job.
Coat the cereal with the white melts
- Immediately pour the melted white candy over the first 1 cup of rice Chex cereal. Use a large spoon or flexible spatula to gently fold and toss the cereal until each piece wears a thin, even coating. Working while the candy is warm ensures a uniform finish without clumping.
Sugar-toss in the bag
- Immediately transfer the coated cereal into the bag holding the 1/3 cup powdered sugar. Seal the bag, leaving just a small corner unzipped to avoid overpressure. Shake gently but firmly — the goal is to coat every piece with a whisper of sugar and separate any candies that may have clumped. Massage the bag lightly from the outside to break apart any clusters while being careful not to crush the cereal.
Remove excess sugar and dry
- Pour the bag’s contents into a fine mesh sieve over a bowl and shake lightly to remove extra powdered sugar. Spread the coated pieces in a single layer on the prepared baking sheet to dry. If any pieces are stuck together, pull them apart quickly and return the separated pieces to the discarded sugar in the bowl, then shake once more in the bag to re-coat. Let the pieces sit undisturbed until the coating is fully set — usually 15–20 minutes depending on room temperature.
Reset the bag and repeat
- Let any remaining candy melts clinging to the bag dry for a few minutes, then crinkle the empty bag to loosen and remove hardened bits. Wipe the bowl and work surface if needed, and deposit 1/3 cup fresh powdered sugar into the now-clean bag. Melt the light blue candy melts following the same microwave method, coat the second cup of cereal, transfer to the bag, and repeat the sugar-toss and drying steps.
Finish with the royal blue
- Repeat the melting, coating, and sugar-toss for the final cup of cereal using the royal blue candy melts. Because the darker color can show fingerprints or smudges more easily, work with clean hands or disposable gloves when handling the final pieces for a pristine presentation.
Combine and present
- Once all three colors are fully set and dry, gently mix them together in a large serving bowl for a joyful, mixed presentation — or keep the colors in separate bowls for a tiered, monochromatic display. Lightly sift a tiny bit more powdered sugar over the top if you want a softer, cohesive finish.
Storage and make-ahead notes
- Allow the puppy chow to cool completely before transferring to an airtight container. For best texture and shine, store at room temperature for up to 2 days. If you’re preparing it for a shower that’s a day ahead, make the puppy chow the morning before the event and keep it in a cool, dry place to preserve the candy melt sheen.
Why each step matters
- Melting slowly and stirring frequently keeps the candy smooth and glossy, which is what gives the puppy chow its refined look.
- Tossing in powdered sugar while still slightly tacky helps the sugar adhere evenly without clumping.
- Using separate bowls and batches for each color guarantees even coverage and clean, distinct shades on the table.
- Quick drying on parchment prevents sticking and keeps the pieces individually delicate and easy to serve.
Common Mistakes to Avoid
Making puppy chow for a celebration should feel like a calming, creative moment — not a source of stress. These common mistakes are simple to avoid and easy to learn from.
Mistake 1: Overcomplicating presentation
It’s tempting to try a dozen tiny bowls and elaborate garnishes, but small, thoughtful choices are more elegant than excess. Keep it simple: one beautiful bowl for mixed colors, or three coordinated dishes to highlight each hue. A few well-placed sugar pearls or a ribbon-tied favor bag go further than a cluttered table.
Mistake 2: Poor timing and prep planning
Waiting until the last minute to melt candy melts can bottleneck your prep. Stage everything in advance — cereal measured, powdered sugar portioned, bowls clean — then melt and coat in quick, calm cycles. Because puppy chow is quick to make, the real time saver is having tools and ingredients at the ready.
Mistake 3: Serving logistics for gatherings
Putting puppy chow in a deep bowl without a serving spoon or without individual portions can create sticky, messy moments for guests. Offer small tongs or scoops and use shallow serving bowls or pretty paper cones for easy self-serve. If you plan to offer favors, portion into labeled bags ahead of time to reduce table traffic.
Serving Suggestions for Puppy Chow
Puppy chow is a playful, nostalgic snack that can read as polished with just a few guiding touches. Here are refined ways to present it so the dessert table feels cohesive and celebratory.
Elegant presentation and plating
Choose a shallow, wide bowl in a neutral color — porcelain white or matte stoneware — so the blues pop. Sprinkle a few matching sugar pearls on top and tuck in a small serving spoon with a ribbon tied to the handle. For an elevated look, serve a portion on a narrow rectangular tray lined with parchment and sprinkle edible confetti lightly around the edges.
Buffet-style or table-ready serving
For a dessert buffet, place the puppy chow in two or three shallow bowls spaced along the table, alternating heights with cake stands or boxes draped in cloth to create visual interest. Provide small plates and paper cones so guests can help themselves without lingering at the table. Label the bowl with a simple handwritten tag: “It’s a Boy! Puppy Chow” — it’s charming and informative.
Pairing with other baby-shower foods
This puppy chow pairs beautifully with light, fresh items that balance its sweetness. Think citrus-scented shortbread cookies, a platter of fresh berries, or a simple yogurt parfait bar. For a savory contrast, include a tray of herbed goat cheese crostini or a crisp vegetable platter with a tangy lemon-dill dip. These pairings keep the menu varied and ensure every guest finds something they love.

Conclusion
I design this recipe with hosts in mind: someone who wants a bit of glamour without fuss, and a table that feels lovingly assembled from small, intentional choices. If you’d like a visual reference or an alternate take on the recipe, I recommend checking the original inspiration at It’s a Boy Puppy Chow – Three Olives Branch for extra ideas and imagery. When you set out your bowls and let that soft blue scatter across the table, you’ll see how such a simple snack can feel truly celebratory — and you’ll have time to enjoy the moment, too.
FAQs About Puppy Chow
Yes — I recommend making it the morning of the event or up to one day ahead. Stored in an airtight container at room temperature, the puppy chow keeps best for about 2 days. Making it ahead lets the candy melts set fully and saves you last-minute prep time.
This recipe is easy to multiply. For every additional guest batch, add one cup of rice Chex and about 1/2 cup of candy melts per color if you want to maintain distinct portions. Work in shifts — melt and coat one color at a time — and use multiple bags for shaking to keep the process organized. For a buffet, display the mix in several bowls so guests can gather without crowding.
For a refined look, serve the mixed colors in a shallow white or glass bowl accented with a few sugar pearls. For a structured display, use three coordinated dishes, each holding one color. Offer small scoops or paper cones for easy portioning. I always make sure utensils and small plates are nearby to keep the table tidy.
Transfer cooled puppy chow to an airtight container and keep it at room temperature in a dry place. For the best texture and appearance, enjoy within 2 days. If humidity is high, add a small paper towel to the container to absorb moisture and preserve the crispness.
Absolutely. Use certified gluten-free rice Chex (the rice variety is typically gluten-free) and check candy melt packaging if you need allergen information. For a dairy-free option, choose dairy-free candy melts or white chocolate alternatives. If you’re coordinating colors for a theme, try marbling one batch of white-coated cereal with a light drizzle of the blue melts for a single-bowl solution that still reads special.
It’s a Boy! Puppy Chow
Ingredients
Essentials
- 3 cups rice Chex cereal, divided into three 1-cup portions Naturally crisp and gluten-free.
- 1/2 cup bright white candy melts For the clean, elegant base tone.
- 1/2 cup light blue candy melts A soft, celebratory hue.
- 1/2 cup royal blue candy melts For depth and contrast.
- 1 cup powdered sugar, divided into roughly 1/3 cup per color Provides the classic powdered finish and helps set the candy coating.
- 1 each quart- or gallon-sized resealable plastic bags For shaking the powdered sugar coat.
- 1 each parchment paper or silicone baking mat and baking sheet For drying and separating the pieces.
- 1 each mixing bowls large enough to toss cereal with melted candy Deep bowls or soup bowls work best.
- 1 each spoon or spatula For gentle tossing.
- 1 each fine mesh sieve Optional but helpful for removing excess powdered sugar.
Optional Add-ons
- to taste baby-themed violet or white sugar pearls or tiny blue sprinkles Use sparingly to avoid clumping.
- light dusting edible pearl or silver luster dust For a subtle sheen.
- 1/2 cup toasted slivered almonds or finely chopped pistachios For nut-friendly guests.
- 1 cup mini marshmallows For a soft, pillowy complement.
- 1 each squeeze bottle of white chocolate For a light drizzle.
Instructions
Preparation
- Line a baking sheet with parchment paper or a silicone mat and set it within reach. Measure the cereal into three even 1-cup portions and set each aside in separate small bowls.
- Portion about 1/3 cup powdered sugar into a clean quart- or gallon-sized resealable plastic bag for the first color.
Melt the Candy Melts
- Place the bright white candy melts in a microwave-safe bowl. Microwave in 15–20 second bursts, stirring well between bursts, until glossy and smooth.
Coat the Cereal
- Immediately pour the melted white candy over the first 1 cup of rice Chex cereal. Use a large spoon or flexible spatula to gently fold and toss until coated.
Sugar Toss
- Transfer the coated cereal into the bag with the powdered sugar. Seal the bag and shake gently to coat every piece.
Dry the Coated Cereal
- Pour the contents into a fine mesh sieve and shake to remove excess sugar. Spread in a single layer on the baking sheet to dry.
Repeat for Remaining Colors
- Repeat the process for the light blue and then royal blue candy melts, ensuring to clean the bag and bowl between colors.
Combine and Serve
- Once all colors are set, mix them in a large serving bowl or keep them separate in distinct bowls for a monochromatic display.